Monday, 27 May 2013

Learning Outcome 9_Reflect on practice and recognise and critically appraise strengths and weaknesses

With my work I think my strengths are the following based on both personal opinion. As well as feedback from industry professionals and tutors.
  • Use of and understanding of Composition. I believe this one is self explanatory, and is probably one of my strongest skills.
  • Use of and understanding of colour - this is open to debate but for the most part I believe I usually have quiet strong use of colour. However in a recent feedback session for the Atomhawk work it was pointed out I did not have a cohesive colour scheme that matched my initial thumbnails. I believe this shows I need to not get complacent when planing my colour schemes as it can lead to create lower quality work than I am capable of.
  • Understanding of ideation and design principles in order to create various answers and design directions for briefs.
  • Communication ability, and a general understanding of my practice as a concept artist.
  • Creation of environments to a high standard. I believe at the moment my environments are quite strong, whilst my lighting could use improvement as confirmed by my presentation with Ron from Atomhawk, I feel my environment design and general output for environment designs shows a higher ability level than my other work.
  • Strong researching skills as demonstrated in my previous posts showing use of reference. And in my opinion I believe I demonstrate in my presentations of my work that I have thoroughly researched all aspects of my designs.
Again based on feedback from professionals, my tutors, and my own opinion I believe these are my weaknesses.
  • Lack of preparation for my work sometimes leads to easily avoided mistakes, as an example for the Atomhawk brief the final environment Illustration, 'The Clearing' I should have spent more time making sure my perspective was correct before going into rendering. As well as making sure I had worked out the value grouping before hand. This would of saved a lot of time with the corrections I had to make later on in the process.
    Moreover with the example in a previous learning outcome I could of created a better designed Shadow creature if I had spent more time in the initial design phase in order to tell earlier the design was not working instead of going straight into rendering.
  • Carrying on from the previous point about perspective, I tend to add confusing perspective choices in my work which lead to problems later. This could easily be addressed by spending more time in the initial foundation stages of my work.
  • Figure drawing and character design are by far my weakest areas of expertise and they are really holding my work back. I feel I spend so much time struggling with the anatomy of the figure the design suffers. Or I do the opposite and the figure ends up being of a very poor standard.
  • As a relation to the above my characters all lack expressive faces, and when I do try to do expressions they tend to look awkward and stiff.
  • My presentation skills could use a lot of improving, especially my tendency to waffle in the presentation of research stage.
  • Sometimes my designs suffer and are not clear due to my use of a inappropriate idealisation method ex. using silhouettes and then forgetting to flesh them out as sketches.
  • And related to this is again lack of preparation for my work. With the Assassins Creed brief for instance I should of spent more time getting the figure correct first, and then designing on top of the character. Instead it just ended up like Id thought about the design and not the figure as well.
Learning Outcome 8_Explore and evaluate a range of visual responses to a brief.

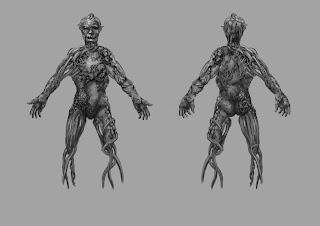
For the Atomhawk brief I initially had this design for my final 'The Shadow' creature.

 
However I felt that this creature design was not working from both an aesthetic and design perspective. Also it did not fit very well with my initial intention of creating a creature made of lots of different environmental pieces example dirt, twigs, rocks etc And instead looked like some weird vegetable man lol
Moreover the design did not look related to the given example for the 'lamphead' creatures Atomhawk had already designed. As such I went back to my initial designs and selected the below design for my final creature which felt much more a part of the 'Lamp Head' creature set compared to my other design. I feel I have better answered the brief as a result of this.


Learning Outcome 7_Demonstrate critical understanding of specialist techniques relevant to Concept Art.

Here are some of my ideation drawings and turnarounds which I believe addresses this learning outcome.


Learning Outcome 6_Analyse and interpret challenging client briefs and produce relevant and original work in response.

This is some example work from the Assassins creed brief. I found this brief very challenging as my figure drawing and character design are the areas I need to improve on the most. Moreover my chosen area of design the Aztecs was a difficult era to match the brief.

 
And the final character design for the brief which I believe demonstrate an original take on the Assassins Creed character whilst still being somewhat recognisable to the brand.
For my feedback it was mentioned by the Art Director Jack Couvella that I had done possibly the best I can do with that era with the design choices I had made. But in future that if it starts to feel like its very hard to match the brand to the era then its probably best to change the era as you cant change the brand.

Learning Outcome 5_Demonstrate a professional and effective approach to the specialist area of 'Pitch Presentations'.

In my opinion the key to an effective approach to a pitch presentation comes down to preparation. For instance working out a plan of how you will present your work and then practising what you will say during the presentation.
Generally you will show your work in the order you did it, like have initial research first. Then following this up with initial designs, followed by your improved iterations as you go. Finally concluding with your final work.
As you are presenting you’ll more than likely be listening to feedback as with most client artist talks, and generally the presentation will have a lot of back and forth. So you should know your work, research, designs, and so on thoroughly so that you can have a conversation with the art director, or whomever you are presenting to.
The presentation should be interesting, memorable and to the point. As well as using appropriate body language in order to make the viewer feel at ease and project confidence in yourself and therefore your work.
At the end of the presentation its important to allow for questions, making sure you have the answers or can give the impression you have the resources to answer said question. And to leave contact details and reference to your presentation, and generally just leave a good final impression with the viewers.
And finally establish when to follow up with them about the project being green lit.


Learning Outcome 4_Demonstrate a critical understanding of the key issues relating to Concept Art practice.

The issues relating to concept art practice are the following:
  • Meeting deadlines
  • Effective communication between the client and the concept artist
  • correctly interpreting briefs
  • self analysis and improvement of work, as well as the ability to respond to client feedback.
  • delivering effective ie successfully answers the brief, and quality work ie its to a equal standard or exceed that of contemporary practitioners.
  • Keeping strict confidentiality of work of clients, sticking to NDAs (a non disclosure agreement), and gaining permissions before showcasing work commissioned.
  • Maintaining professional integrity for example not plagiarising others work, respecting intellectual property, keeping to NDAs, and keeping to contracts.
  • Keeping a social media presence and generally keep up with their promotion in order to say relevant.
  • And slightly related to that point keep an up to date portfolio in order to be able to present to potential clients. Especially when working in an industry where your work can go years before your allowed to release it.

Learning Outcome 3_Synthesise complex concepts and professional practice into the production of original imagery.

The Alien line up below are the result of using ideation techniques in order to produce a strong final concept in order to meet a brief:


Learning Outcome 2_Demonstrate a comprehensive knowledge and understanding of concepts, information and techniques at the forefront of Concept Art.

I use a variety of techniques for ideation (definition: to create various ideas) as can be seen in the below examples. They are all commonly used techniques in the industry:  


Learning Outcome 1_Demonstrate a critical understanding of business aspects of working as a concept artist including copyright issues pricing, and the rights of an artist.

In the uk all artists own the rights to their own Intellectual properties automatically (Personal art, character designs, stories, etc), what this means is that unless you specifically give permission another party cannot use your work commercially or otherwise.

One of the ways you can insure that there is proof you own your I.P is to take the initial information document with all of the information pertaining to the I.P and mail it to yourself via registered post without opening it. This ensures you have proof of ownership for the future if any issues should ever arise. This information was confirmed by Microsoft Soho Art Director Lee Brown when he gave a lecture with us.
The cost of a junior concept artist differs widely Between companies, on average though it appears most companies in the uk offer anything between £16k and £18k a year for artists with less than a years experience. The majority of Concept art jobs also are on a per contract basis with anything from £120 - £150 a day. £150 is a common price for a junior concept artist for on a contract basis for the most part, its the amount I was paid whilst working for Warner Brothers entertainment on a short contract for my first job as well.

It should be noted that for the most part you have no choice in how much you get paid, especially when starting off as a freelance artist. Most of the time a client has a very specific amount they pay artists for work and then depending on your experience you can negotiate a bit around this prize.


Monday, 13 May 2013

Assassins Creed:Aztec

Exploration designs for the jewellery.

Aztec Temple Complex final design
Building design sketches

Assassins Creed: Aztec


This is all of my work for the Ubisoft Assassins Creed brief. I decided to go with an Aztec version of the design as I havent explored that culture in my art before and the culture is very different from previous Assassin Creed games therefore I felt it would be the most challenging one to do.


Initial Assassin Sketches

Further exploration of designs

Final exploration of designs
Assassin Model sheet, back and front view


3/4 Final Assassin Design sketch
We had to design a weapon or mechanical object as part of the brief. I decided to create an AtlAtl which is a traditional Aztec weapon used to throw darts. I kept it simple by having a bladed weapon which has an extension to throw the darts, and then rotates to be used as a blade.

Initial Weapon ideas
Final weapon design


Final Atomhawk work


Heres a slightly more refined version of my clearing scene. I added a few changes to help with the composition such as adding elements that point towards the centre of the picture, and changing the placement of the rocks.


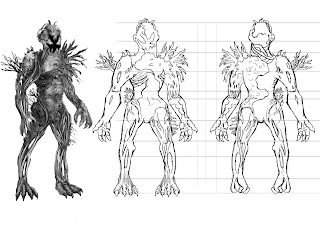
I didnt really like my previous shadow creature design so I did another one that I believe is closer to the style of the game, it is based off of one of the thumbnails from my initial sheet of thumbnails.

Saturday, 13 April 2013

The Clearing Version 2

Here is my final version of The Clearing scene, I improved based on some feedback from Jack Couvella who is an Art Director for Ubisoft Reflections. He pointed out a bunch of perspective problems I needed to solve, and suggested I try to push the depth and scale. Hopefully it looks much better now. I also changed the forground significantly, to make a more interesting composition. As well as using the rocks to point to the central Greys Monument.

Edit: Heres my final final version haha Ive nitpicked this illustration to death now. For the most part I am just trying to fix the dramatic change in contrast between the bottom left and the rest of the painting. And I've tried to make the lighting a bit more contrasty - who knew contrasty is actually a word.

Saturday, 6 April 2013

Atomhawk 'The Realm' Brief


These are the location sketches for the Atomhawk Games brief. They are all based on photographs that I took whilst I was in Newcastle. Before I did any of these I did a lot of research into how nature reclaims structures, and also spent some time watch the 'Life after Humans' documentary series in order to better judge how to illustrate this I.P. setting. (1000 years in the future, nature has reclaimed the world, event has helped to destroy it etc)


I then went on to choose 3 places to do the black and white building studies which had to include greys monument. I decided to go with the shops surrounding greys monument, and the train bridge near grey street.

Next I went on to do two designs which featured the event which has destroyed the world. I felt that some kind of organic alien spaceship crash would help to explain how the world could change so much and bring back 'magic' as well as bringing plants to life etc.


For the clearing scene that had to be built around the pedestrianised area of greys monument. I felt a combination of the 3 areas that I liked from my location sketches would fit best. I liked the idea of a leaning/collapsed greys monument which was close to the old shops with trees and swamps growing around it. Cropped by the overhanging roof of the left hand street entry as you initially walk into greys monument are area in New Castle.

Of course they are not all this close together in real life but I felt it made for a more compelling concept by combining all 3 into an interesting composition and possible area to explore in the game.


I could of stopped the project here as I only had to do the environment section however I wanted to challenge myself so I tried to do the shadow as well. To start with I did 2 A3 sized pages full of thumbnails, a cross between sillouettes and value sketches. I tried to sketch them more naturally rather than in lines if that makes sense, in order to come up with more interesting ideas.

For the pose I decided to do a combination of thubnails 4/15/18 to create a dynamic character whic his made up of roots, moss, rocks, basically a loose collection of terrain in order for the creature to blend in with its surroundings. Sort of a elemental character whom controls the vines and 'lamphead' creatures in the game.


Lastly for the colour version I took my model sheet and rendered it as much as I could. I wanted to echo the colourful saturated nature of my final environment piece in the design to keep it part of the same world. As well as hopefully have a mix between creepy and scary in the design but still pg13, due to age group for the game.


I really enjoyed doing this project, creating the world and all of the ways nature has integrated with the city. However I dont think I was very successful in matching the style of the game set by Atomhawk due to the way I have illustrated the world. Instead I have tried to illustrate the world in the same vein as what has been set but as my own take.

In that respect I believe I would be unsuccessful if this was an actual art test as it would not fit in with the established team. In forethought I should of tried to really simplify my work similar to the reference given in order to better match the set style of the game rather than to do work similar to what I enjoy doing (stylised realism I guess).


Friday, 15 March 2013

Marco Polo Development sheets

Initially I started off my Marco Polo child designs in a cartoony style of drawing. I felt this was style was too forced and therefore I went towards more of my usual realistic style of rendering. Whilst my goal was to try and create a realistic style of work I incorporated some of the initial exaggeration from the first cartoony sketches, so that work didn't end up looking stiff. I think it has worked much better than if I were to try and make myself render in a cartoon like style, more akin of Dreamworks animation.   

Another area of difference from my usual work flow is the idea of doing the designs as figures in motion, showing poses that reflected the characters traits. This really helped me flesh out the character design and get a more interesting character design in the end I feel.

My goal with the Marco Polo designs was to have a character whom initially would look more akin to towards a 16th century Tudor style of culture whilst as a child. This was to reflect his beginnings and to help enhance the look of a character whom has been influenced as an Adult by his travels.

In my initial paragraph that laid out the world I was going to incorporate steam punk elements in to the design, but I decided that those kind of designs are quiet tired and I felt design a mixture of Tudor and Chinese/Mongol 16th century clothing styles was challenging and visually interesting that it didn’t need the added science fiction influences.

It also helped to keep to doing something that is out of my comfort zone which is the point of the whole brief. With the face I initially had a cutesy look going for Marco Polos child version, however this looked like just any child.

As such I decided to research forensic ageing photos which lead me to try and reverse engineer the adult drawings/paintings I found of Marco Polo. From my research I found that I could only find pictures of when he was middle aged and from when he was more or less at the end of his life. As such I had no reference for what he could of looked like as a child.

My initial head shots of the character I thought looked older than the required age range, with the final design I tried to add more baby fat to the bone structure of the face, it seemed to help both make the child look younger and also 'cuter' for more audience appeal.

One of the areas I find difficult was balance out the fat and bone structure of the face so that the character looked masculine and young, but not feminine or androgynous which appears to be the danger of drawing children. Before this project I should clarify I have never drawn children before, so this has been a great learning experience.

With the adult Marco Polo I decided to depict him in his mid 30s/late 20s as I felt that drawing him as an older character would force me towards just copying the famous images of him for the iconic appeal, and thus reducing the challenge of the brief. As Marco Polo is not depicted really as younger than 40 from my initial research. This therefore made designing him much more interesting and rewarding from a creative and educational standpoint.

For the adult facial design I basically just took the younger face and trimmed the baby fat, added more planes to the face as your face becomes more defined as you get older and Ive added some wrinkles as well as sunk the eyes into the brow. In regards to his style of clothes as mentioned I wanted to mix traditional Chinese and Mongol dress from the 15/16th centuries with Tudor era clothes.

I felt their styles of clothing were so different it really helped give him that strange/otherworldly appearance he is famous for having when first returning from his 17 years in China.

At this stage I am quiet happy with the designs, I plan to come back to them later to render them out for presentation. If I get the time I will probably depict the Adult version of Marco polo in various poses as well.

I will leave them as is for now, as I need to move on to the Atomhawk brief for their in-house 'The Realm I.P.' I am heading up to Newcastle for some reference shooting soon so I will hopefully get this project started after that.

Edit: I decided to do a final sheet of development sketches exploring the style of of the characters with a visible line and 4 tonal colours. I think with a bit of work they would probably work much better for animation than my preferred style of painting that focuses on pushing the realism to what I can manage.


Dreamworks outreach Brief

The first brief I decided to tackle is for the Dreamworks outreach program. Essentially I have to create a iconic character as a child and an adult. I went with Marco Polo as I figured he would be as far out of my 'comfort zone' as I can get. Also Marco Polo doesn't really have an defining visual characteristics so I felt it would be much more challenging and therefore enlightening to try and depict him as a both a child and an adult.

The complete brief for this module is as follows:

Brief: Design 2 versions of an iconic character. One version should be the character as a child - between 5 -10 years old. The other version should be the same character as an adult.
Try to choose a character out of your personal ‘comfort zone’ – if you usually design sci-fi warriors/monsters – or young female characters – challenge yourself by choosing a different option for this project.

Choose from:

  • Merlin
  • Caliban (from The Tempest)
  • Bluebeard
  • Tinkerbell
  • Marco Polo
  • Wyatt Earp
  • Barbarella
  • Achilles
  • Maid Marion (from Robin Hood)
  • The Wolfman

After you have thoroughly researched your character's previous designs and iconography - and before you start working on your original design - write a brief description of the world your new versions of the character will inhabit. Create a mood board for yourself to refer to when considering details of anatomy/costume.
In particular, ask yourself these questions:

  • At what date is this character living?
You may design an updated version of a classic character or place the character in a new environment (eg: Marco Polo as a space explorer) - or keep to the appropriate historical period for him/her.

  • What are his/her/its prevailing weather/accommodation/lifestyle conditions?
How will this environment influence clothing/weapons/physique?

  • How will the environment affect the character’s appearance?
Example - in How to Train Your Dragon some of the key action sequences take place underwater - so aquatic dragons were also designed. The Avatar sequel also takes place under water - lots of interesting design possibilities there!

Remember that, although this is your original design - the character design should still be recognisable as the source character. 
 
Example - updated versions of Alice in Wonderland (there have recently been several) tend to reference iconic 'Alice' design elements such as long hair, blue dress, apron etc.
Note how leading character designers such as Iain McCaig reference costume elements from different cultures/historic periods to give sense of authenticity to futuristic designs (Queen Amidala/Jedi Knights).

If you choose to create a non-human character such as Caliban or the Wolfman make sure the anatomy - however fantastic - is believable - do thorough research before starting designs.